Borduren is een tijdloze en hoogwaardige methode om kleding en accessoires te personaliseren. Of je nu een logo aan een werkuniform wilt toevoegen of een cadeau een persoonlijke touch wilt geven, borduurwerk zorgt voor een duurzame en professionele afwerking. Maar wat komt er precies kijken bij het maken van een geborduurd ontwerp? Hier is een stapsgewijze uitleg van het borduurproces.
Ontwerpvoorbereiding
Elk borduurproject begint met een digitaal ontwerp. In tegenstelling tot geprinte afbeeldingen vereist borduurwerk een specifiek bestandstype, namelijk een gedigitaliseerd borduurbestand. Dit proces omvat:
-
Het omzetten van het ontwerp naar een steekbestand met borduursoftware.
-
Het aanpassen van steektypes, dichtheid en richting om ervoor te zorgen dat het ontwerp er goed uitziet op stof.
-
Het kiezen van de juiste garenkleuren om je ontwerp nauwkeurig weer te geven.
Stoffen en Kledingkeuze
Zodra het ontwerp klaar is, volgt het kiezen van de juiste stof of het geschikte kledingstuk om op te borduren. Verschillende materialen vragen om verschillende verstevigingen en draaispanningen. Stevige stoffen zoals katoen, polyester-mengsels en keperstof zijn ideaal, terwijl delicate stoffen extra ondersteuning nodig kunnen hebben.
De Juiste Draad en Naald Kiezen
De kwaliteit van het borduurwerk hangt sterk af van het type draad en naald dat wordt gebruikt. Populaire opties voor garen zijn:
-
Polyestergaren – Duurzaam en bestand tegen vervagen of krimpen.
-
Rayaongaren – Glad en glanzend, voor een luxe uitstraling.
-
Katoengaren – Geeft een traditionelere, matte afwerking.
Naalden variëren in grootte en type, afhankelijk van de stof. Bolkopnaalden zijn het meest geschikt voor gebreide stoffen, terwijl scherpe naalden beter werken op geweven stoffen.
Inspannen en Verstevigen
Om nette en egale steken te garanderen, moet de stof worden ingespannen en verstevigd. De ring (hoop) houdt de stof strak op z’n plaats om beweging tijdens het borduren te voorkomen. Achter de stof wordt een versteviger geplaatst voor extra steun en om plooien te voorkomen. Veelgebruikte soorten versteviging zijn:
-
Tear-away verstevigers – Makkelijk te verwijderen, ideaal voor stevige stoffen.
-
Cut-away verstevigers – Biedt langdurige ondersteuning voor rekbare materialen.
-
Wateroplosbare verstevigers – Worden gebruikt voor delicate stoffen waarbij geen zichtbare achterkant gewenst is.
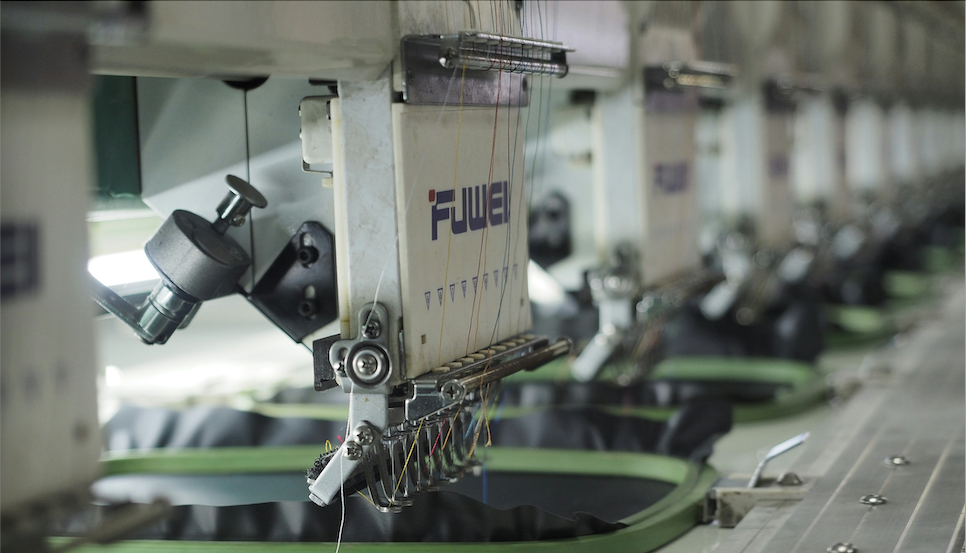
Instellen van de Borduurmachine
De voorbereide stof wordt in de borduurmachine geplaatst. De machine wordt geprogrammeerd met het gedigitaliseerde ontwerp en ingesteld op de juiste snelheid en steekaantallen. Hoogwaardige borduurmachines kunnen meerdere garenkleuren en gedetailleerde ontwerpen nauwkeurig verwerken.
Het Ontwerp Borduren
Zodra de machine begint met borduren, volgt het nauwkeurig de geprogrammeerde instructies om het ontwerp tot leven te brengen. Dit proces kan enkele minuten tot meer dan een uur duren, afhankelijk van de complexiteit en grootte van het ontwerp. Tijdens deze fase kan de machine pauzeren om garenkleuren te wisselen of de steekrichting aan te passen.